
Each user must be assigned an OrgPlus RealTime role, which determines the user’s access privileges as follows;
• Access to an organization (including limited access to an organization)
• Access to views within an organization
• Access to features, such as Planning or Publishing
• Access to individual fields (on a box by box basis)
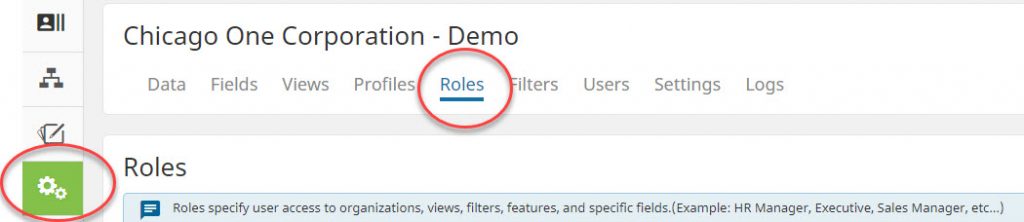
Roles are managed from the Roles Page via the Administrative Interface:
1. In the left-side navigation bar, click Administration (Ensure you have the correct Organization chosen).
2. Click Roles to display the Roles Page.
Creating a role
- On the Roles page, click the New Role button.
- Fill out the necessary information about the role:
- Name: Enter a descriptive name for the role (such as Manager).
- Role ID: Enter an identifier for the role (optional).
- Description: Enter a description for the role (optional).
- Fill out the Employee Access, Workforce Planning Access, Data Access, Features, and Assign Views information for the role. See the sections below for more information.
- Click Save Role. The role is added to the roles list.
Employee Access
Employee Access refers to the employee records (boxes) that a specific role can access in the chart. You can limit access to a range of the org chart and/or select a filter to determine access. You can also specify the box that is first visible for the role when the user signs in.
To configure Employee Access:
1. In the Roles Editor, click the Employee Access header.
2. In the “Chart Range” section, select the range for the role:
• Top of Chart: The top-most box in the hierarchy defines the top box (think CEO). The role can access all boxes on the chart.
• Myself: The role can access its own box, and all subordinate boxes in its branch.
• Level N Supervisor: Specifies how many levels above the role’s own level are accessible. For instance, selecting level 1 from the drop-down menu gives the role access to boxes from one level above itself down to the bottom of the branch; selecting level 2 gives the role access to two levels above itself down to the bottom of the branch; and so on. This is especially useful for an Administrative assistant-type role.
3. In the “Starting Point” section, select the displayed top box for the role:
• Top of Chart: The starting point is the top-most box in the hierarchy.
• Myself: The current user’s box is the role’s starting point.
• Level N Supervisor: Specifies how many levels above the current user’s position is the role’s starting point. For instance, selecting level 1 from the drop-down menu makes the starting point the current user’s direct manager; Level 2 makes the starting point of the current user’s manager’s manager, and so on.
4. Use the Filter drop-down menu to select a filter to apply to the role (optional). For more information, see Creating a Filter.
5. Use the Precedence drop-down menu to select how the role is applied:
• Range or Filter applies the role if the user is viewing a part of the chart included in either the range or the filter.
• Range and Filter applies the role if the user is viewing a part of the chart included in both the range and the filter.
6. Click Save Role to save the role and close the Role Editor, or select another header to continue configuring the role.
Planning Access
Planning access describes the employee records (boxes) that a specific role can edit in a plan. As with employee access, you can limit editing access to a range of the org chart, and apply filters to access as well.
To configure planning record access:
1. In the Roles Editor, click the Planning Access header.
2. In the Chart Range section, select the range for the role:
• Top of Chart: This allows a user to edit all boxes in the chart.
• Myself: This role allows a user to edit their own box and all subordinate boxes in the same branch.
• Level N Supervisor: Specifies how many levels above the role’s own level are accessible. For instance, selecting level 1 from the drop-down menu gives the role access to boxes from one level above itself down to the bottom of the branch; selecting level 2 gives the role access to two levels above itself down to the bottom of the branch; and so on.
3. Use the Filter drop-down menu to select a filter to apply to the role (optional). For more information, see Creating a Filter.
4. Use the Precedence drop-down menu to select how the role is applied:
• Range or Filter applies the role if the user is viewing a part of the chart included in either the range or the filter.
• Range and Filter applies the role if the user is viewing a part of the chart included in both the range and the filter.
5. Click Save Role to save the role and close the Role Editor, or select another header to continue configuring the role.
Data Access
In Data Access, field policies determine which fields a user can view or edit in a chart box. A field policy includes one or more fields and is attached to a role. When that role is attached to a user, the user can only interact with the specified fields according to the rules of the policy.
To configure a field policy:
1. In the Roles Editor, click the Data Access header.
2. To create a new policy, click Add Policy; to edit an existing policy, click the policy from the list.
3. Enter a name for the policy in the Policy Name text box. Be descriptive if possible.
4. Use the Fields drop-down menu to select fields to include in the policy. You can enter multiple fields to the policy, one at a time. You can also use the Add All and Remove All buttons to quickly change the entries.
5. Use the Range drop-down menu to select the structural security rules:
• Entire Chart: Displays the policy’s fields in all boxes.
• Mgr + Mgr Subordinates: Determines the box corresponding to the current user’s manager and then displays the field in the manager’s box and boxes subordinate to the manager.
• Mgr Subordinates: Determines the box corresponding to the current user’s manager and then displays the field in the boxes subordinate to the manager.
• Self + Subordinates: Determines the box corresponding to the current user and then displays the field in that user’s box and all subordinate boxes.
• Subordinates: Determines the box corresponding to the current user and then displays the field in only subordinate boxes.
• Self: Displays the policy’s fields in the box corresponding to the current user.
6. Use the Filter drop-down menu to select a filter to apply to the fields in the policy. For more information, see Creating a Filter.
7. Use the Range + Filter buttons to to select how the policy is applied:
• Or applies the policy if the user is viewing a part of the chart included in either the range or the filter.
• And applies the policy if the user is viewing a part of the chart included in both the range and the filter.
9. Click Save when you are finished configuring the policy.
In addition to creating and editing policies, you can delete existing Field Policies by clicking the delete icon in the list.
Feature Access
You can control which features a user can interact with by limiting which roles can access a given feature. See the Feature Definitions for a brief description of each.
For example, you may want only employees in the HR department to have the ability to print a chart. In this case, you would restrict the printing feature to users in an HR role.
To establish what features a role can access:
1. In the Roles Editor, click the Features tab.
2. Use the checkboxes to select features that are accessible to the role. Clicking the parent feature (Administration or Save As) selects the individual features beneath it.
3. Click Save Role to save the role and close the Role Editor, or select another header to continue configuring the role.
Assign Views
You can control which views a user can see in the workspace by including the Views in your role. For example, you may want only employees in the HR department to see the view that contains HR-specific fields.
To establish what Views a role can access:
1. In the Roles Editor, click the Views header.
2. Use the Views drop-down menu to select Views to include in the role. You can enter multiple views to the role one at a time, or you can use the Add All and Remove All buttons to quickly change the entries.
3. Click Save Role.
Feature Definitions
Each Feature in an OrgPlus RealTime role allows the user assigned that role to access specific areas of the application.
Administration. This main feature allows the user to access the Administration section of the application, including the Logs. If this is checked, all of the subordinate options are also checked, but each can be granted or removed individually.
- Organization Management – this feature allows users to upload new data source files; add/edit fields; change organization names; edit logos, default fields, and quick search fields; and upload images
- Views – this feature allows users to access and add/edit Views and Profiles
- Roles – this feature allows users to add/edit Roles
- Filters – this feature allows users to add/edit Filters
Sharing. This main feature allows the user to access the Sharing menu in the main chart of a Workforce Plan. If this is checked, all of the subordinate options are also checked, but each can be granted or removed individually.
- PDF – This feature allows users to share (publish) charts and/or plans in a PDF format
- PowerPoint – This feature allows users to share (publish) charts and/or plans in a PowerPoint format
- Excel – This feature allows users to share (publish) charts and/or plans in an Excel format
- HTML – This feature allows users to share (publish) charts and/or plans in a zip file for sharing on a LAN or SharePoint site
Add/Edit Chart Text Box: This feature allows the user to add text boxes to the chart.
Workforce Planning. This main feature allows the user to access the Workforce Plans section of the application. When this option is checked, one of the two below options must be selected.
- View Workforce Plans as Read Only – This feature allows users to view plans that have been shared with them.
- Add/Edit Workforce Plans – This feature allows users to add plans, and to edit/view plans that have been shared with them.
Succession Planning: Allows the user to create/edit/view succession plans.