
Virtual clocks provide a web-based option for time collection from tablets and computer kiosks, so multiple employees can quickly punch. Virtual clocks support quick punch options or detailed punches, including meals, breaks, labor transfers, and tips. It’s included in your Insperity HRCore™ solution at no additional cost.
To enable virtual clocks on new devices, client administrators will need to:
- Work with your Insperity Time & Labor Management implementation or support specialist to enable the virtual clock option for each legal company (FEIN) where they will be used. They will turn on the legal services to grant access to this feature.
- Configure each virtual clock in the Manage Clocks section in isolved People Cloud. For more information, refer to the Setting up a Virtual Clock section in the Virtual Clock article in isolved University.*
- Register each virtual clock in a specific browser on your tablet or computer kiosk.
This article guides you through the virtual clock registration process and provides configuration and troubleshooting tips.
Prepare to register your device
- For Windows devices, determine which Windows account will remain logged in while the Virtual Clock is in use. The Virtual Clock must be registered while this account is logged in.
- Determine which browser on each device will be used for Virtual Clock.
- Note that once Virtual Clock is registered, users on that device using the predetermined Windows account will no longer see the standard login page. Since the login page shares the same URL as the Virtual Clock login page (https://insperity.myisolved.com), users will see the Virtual Clock clock instead.
- Perform the following steps for this browser.
- Ensure that browser is on the latest version.
- Reset that browser to default settings.
- Disable all browser plugins and add-ons.
- Verify cookies are being retained. Refer to the browser’s Support/Help channels to verify settings for cookie retention.
- Determine if you will be using a “kiosk mode” on your device to lock it to a single application/program. If so, the app will need to be the browser you’re using for Virtual Clock.
- For Windows devices, this is called Kiosk Mode.
- For Android devices, this mode is called Screen Pinning.
- For iPads, the equivalent feature is Single App Mode or Guided Access.
- Ensure the user who will be registering the clocks is a client administrator in isolved People Cloud with the Manage Clocks role.
Register your device as a virtual clock
- On Windows devices, ensure the user logs into the device using the Windows account that will remain logged in while the Virtual Clock is in use.
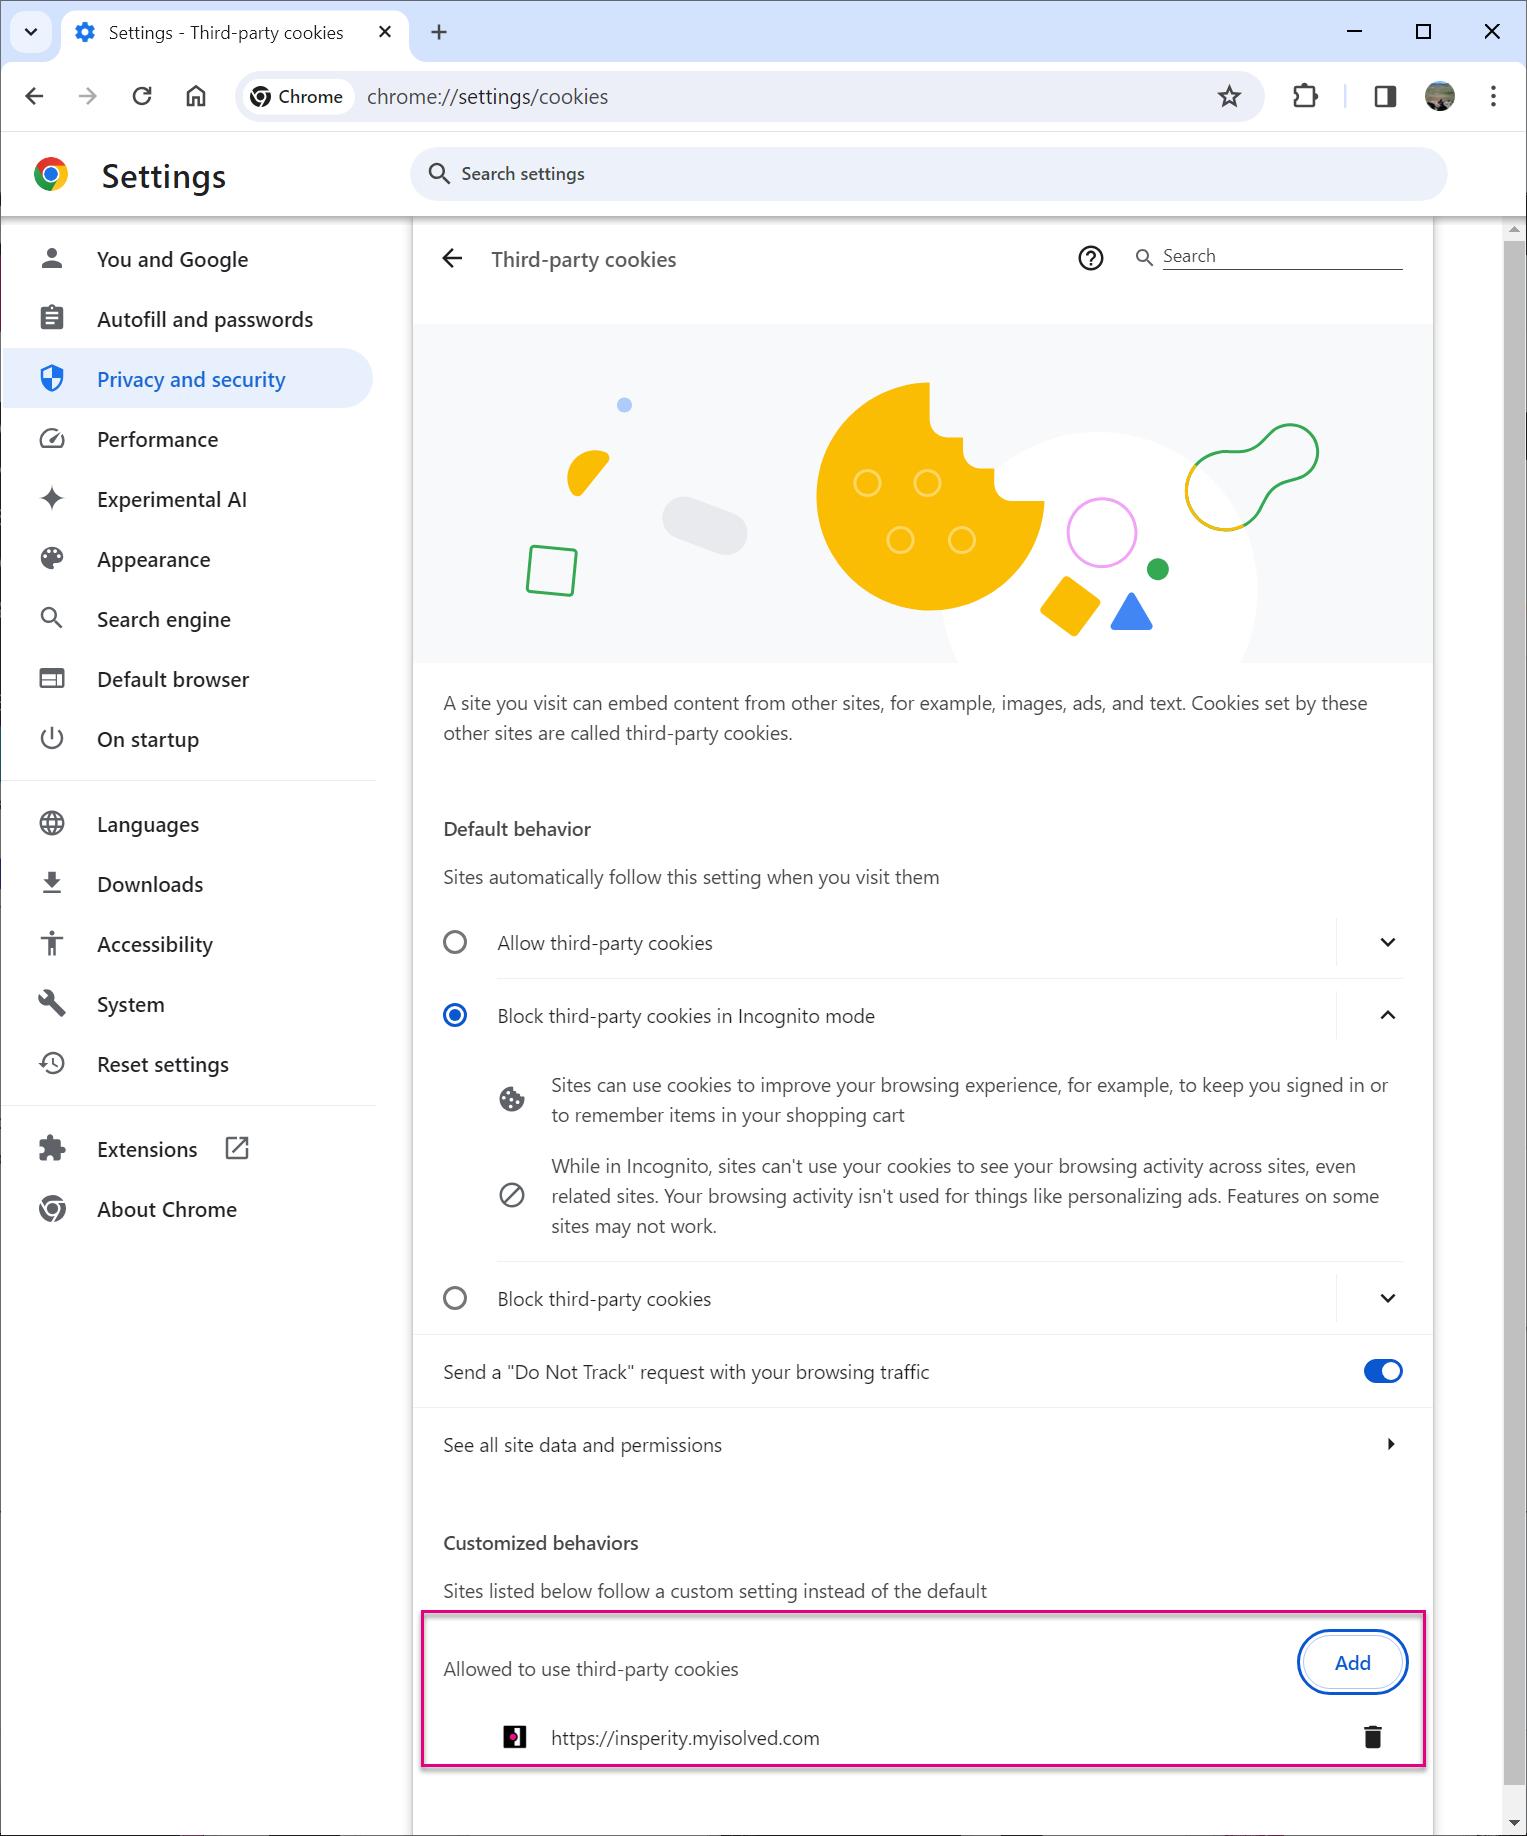
- For the browser you’ve chosen to use, explicitly allow cookies to be saved for the Virtual Clock URL (https://insperity.myisolved.com).
- If using Google Chrome, the setting is available in the Privacy and security section:
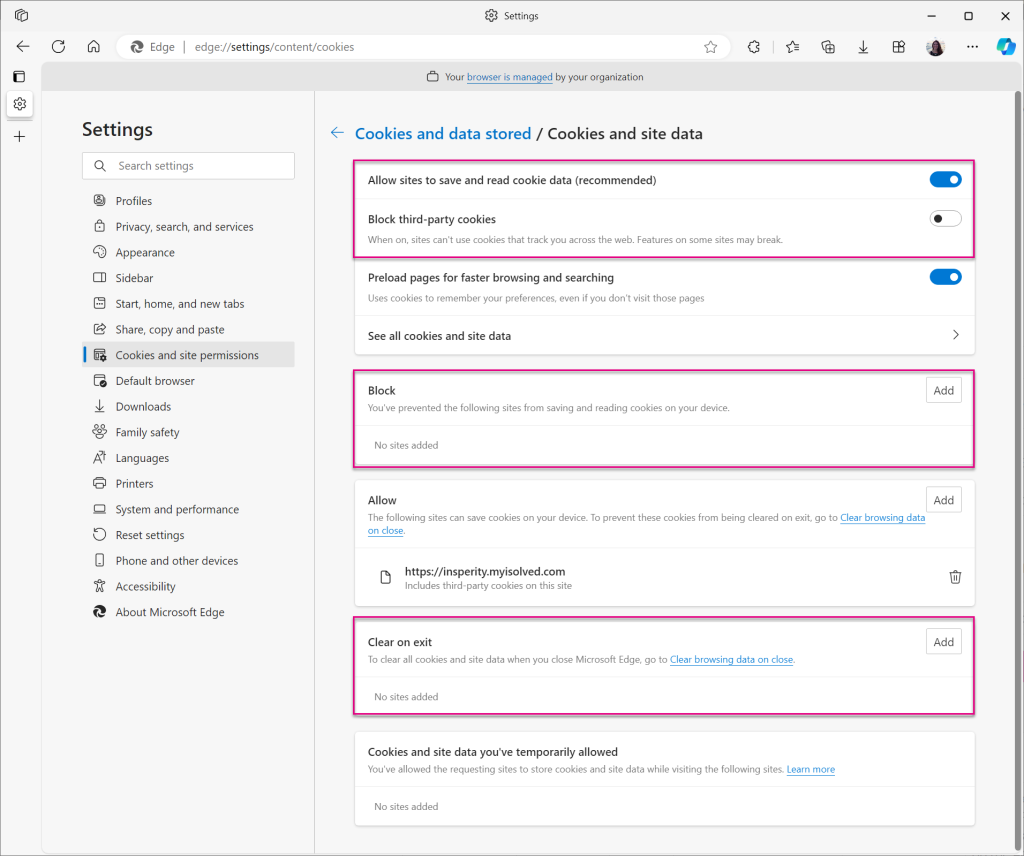
- If using Microsoft Edge, it’s the Cookies and site permissions section in Settings.

- Using the browser where the Virtual Clock will be registered, an isolved client administrator with the Manage Clocks role needs to log into isolved People Cloud (https://insperity.myisolved.com). Be sure to select a client user in the Client Users section when logging in, and not an employee user.
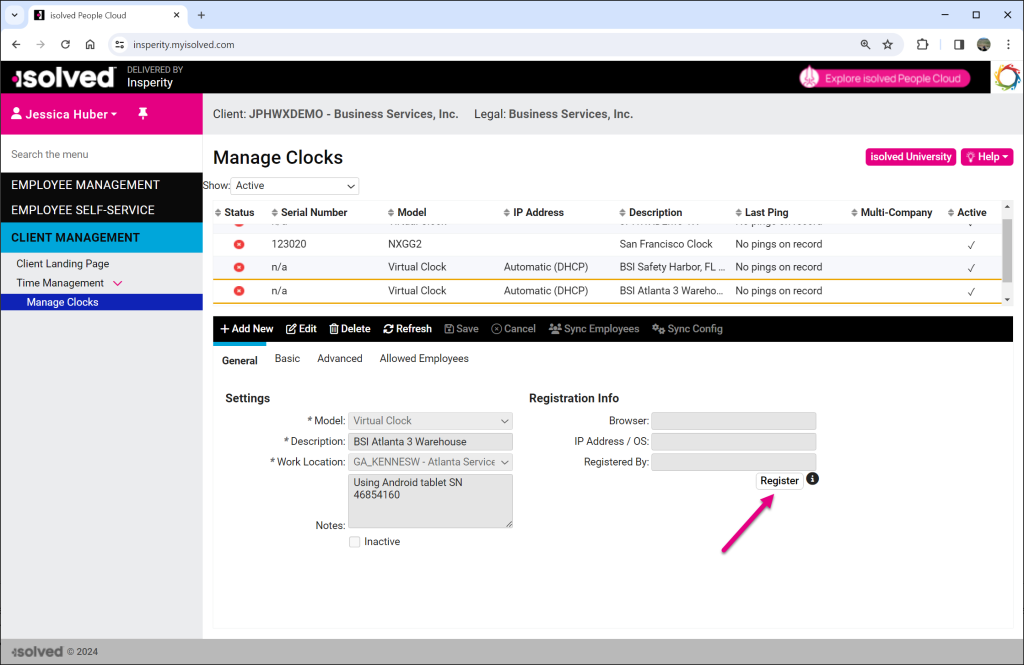
- Navigate to Client Management > Time Management > Manage Clocks.
- Select the Virtual Clock that should be registered and click Register.
- Log out of isolved People Cloud.
- Upon logout, the Virtual Clock should replace the isolved People Cloud login page at the same URL (https://insperity.myisolved.com).
- Test to ensure the Virtual Clock is working as expected based on the settings you enabled on the Manage Clocks screen.
- Test to ensure the Virtual Clock registration will save successfully. We recommend rebooting the device.
- Ensure the correct user is logged in after the reboot.
- If the device is configured to automatically launch the Virtual Clock, ensure the browser page launches successfully. The Virtual Clock should be displayed at the URL https://insperity.myisolved.com.
- Ensure users can successfully punch using the Virtual Clock.
Troubleshoot your virtual clock’s registration
When clocks lose their registration, the root cause of the issue is always the cookie not being saved successfully. To troubleshoot a clock that does not stay registered, follow the below steps.
- On Windows devices, do not switch the Windows account after registering.
- Ensure the browser is configured to save cookies when the browser is closed and when the device is shut down.
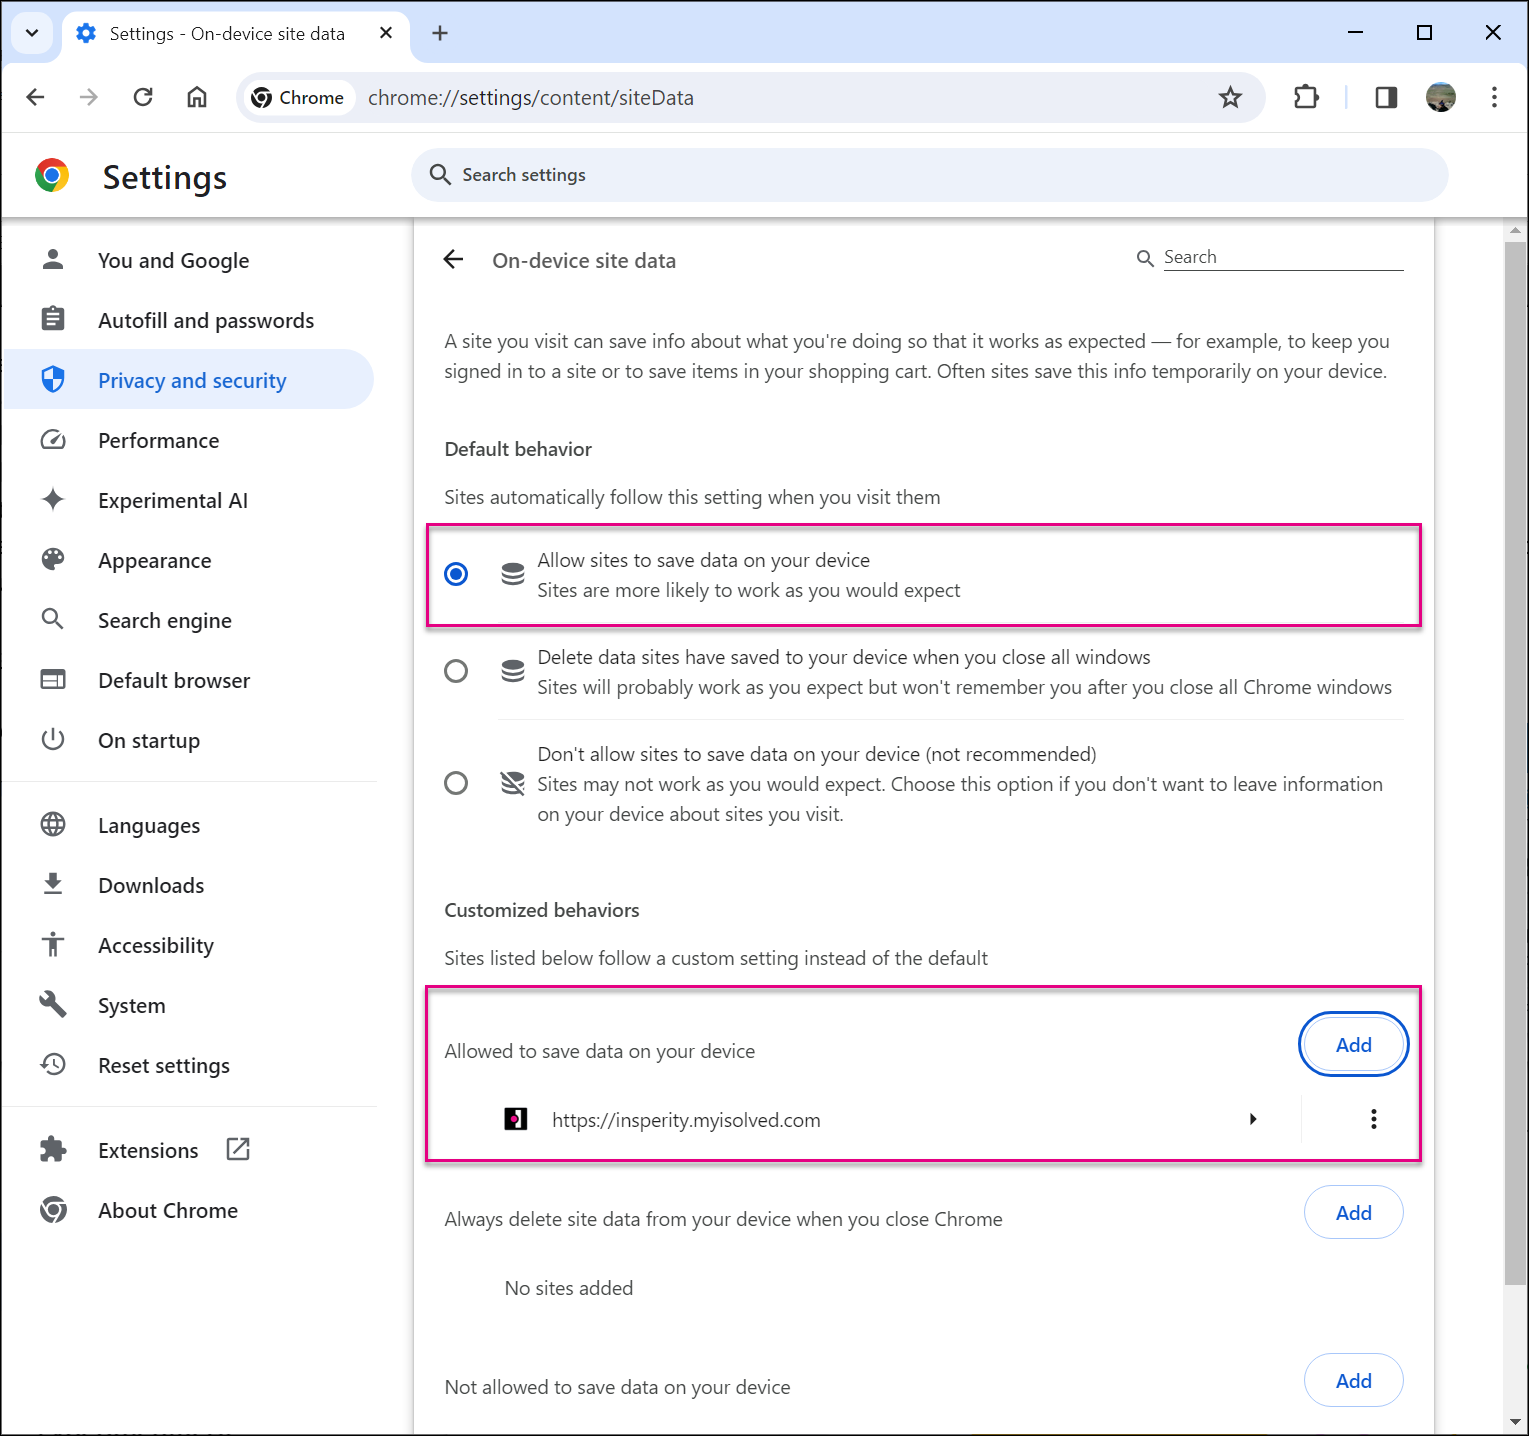
- If using Google Chrome, the setting is available in the Privacy and security section. Navigate to Site Settings. Scroll down to the Content section at the end and then click Additional content settings to expand the options list. Select On-device site data. Ensure the Default Behavior is not set to delete data or not allow saving. You can also explicitly allow the Virtual Clock URL to save information:
- If using Microsoft Edge, it’s the Cookies and site permissions section in Settings. Ensure the following items are configured so cookies and site data will be saved:
- Allow sites to save and read cookie data should be enabled
- Block third-party cookies should be disabled.
- The Virtual Clock URL (https://insperity.myisolved.com) should not be listed in the Block section.
- The Virtual Clock URL (https://insperity.myisolved.com) should not be listed in the Clear on exit section
More Information
For assistance with Virtual Clock registration, work with your Insperity Time & Labor Management Time implementer during your onboarding process or contact WATime@insperity.com for Time & Labor Management support.
For more time collection options in Insperity HRCore Time & Labor Management, see:
- Articles
* These resources require access to isolved University. You will need to log in to view the content. This article can help if you need to register for the University.