
Export employee data from your HRMS
It’s likely that your human resource management system (HRMS) can be configured to export your employee data to a file formatted for OrgPlus RealTime, which supports .txt, .csv, .xls and .xlsx. Once you’ve exported employee data from your HRMS, you need to set up your FTP client and built-in scheduler to automatically transfer your employee data source to Insperity’s Orgplus RealTime FTP mailbox.
About FTP transfer setups
The FTP transfer uses a secure and managed file transfer application. This application may be an installed client application or a cloud application, depending on vendor and product. Once configured, the FTP client will transfer the employee data source file to your unique Insperity FTP mailbox at the scheduled time.
These instructions cover both the implicit and explicit connections using Ipswitch and the explicit connection using the FileZilla FTP client. For clients that do not support FTPS Implicit or Explicit, please reach out to your implementation analyst to explore alternate options.
To use employee photos, set up the FTP client scheduler to transfer those photos to Insperity’s FTP mailbox. Your photos need to be transferred to the folder within the Insperity FTP mailbox labeled “images.”
OrgPlus RealTime supports photo file formats .bmp, .jpg and .png. All photos should be portrait orientation, 100×128 pixels, and 72ppi. Your Insperity FTP mailbox size is limited to 500MB for employee data and photos.
Setup for Ispwitch WS_FTP client
Your setup wizard may vary slightly, depending on the FTP client your organization uses.
Make sure SSL ports 6980-7000 are open.
- Install the FTP client, once complete, launch the FTP application to configure
- Create a label or site name.
- Example: OrgPlus RealTime employee data.
- Example: OrgPlus RealTime photos (optional).
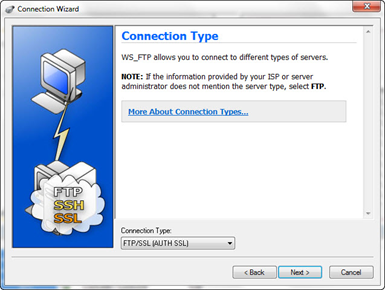
- Set the connection type to FTP/SSL (AUTH SSL) for explicit server and connection and FTPS/Implicit SSL for an implicit server and connection.
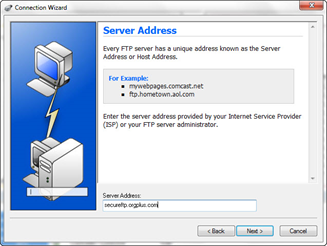
- Enter the server address: secureftp.orgplus.com
- Enter the username and password, which:
- Must be associated with the OrgPlusRealTime administrator
- Must have username must in Secureftp.orgplus.com|your username (note the ‘pipe’ between the URL and username).
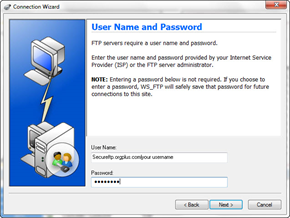
Note: If you change the OrgPlus RealTime administrator’s password, remember to update the password in your FTP client.
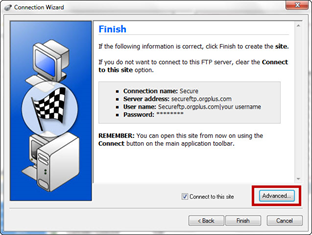
- On the Finish screen, click Advanced.
- Click the Advanced section in the left navigation.
- Disable Use Passive mode for data connections.
- Set Remote Port to 21 for an explicit server connection or 990 for an implicit server connection.
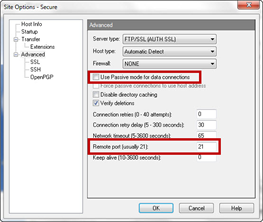
- Click Ok
- Click Finish (If not prompted, launch your FTP client to connect).
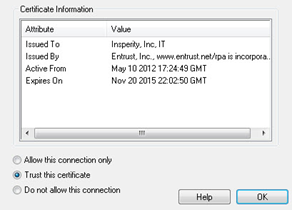
- Click Trust this Certificate and OK to accept the Insperity certificate.
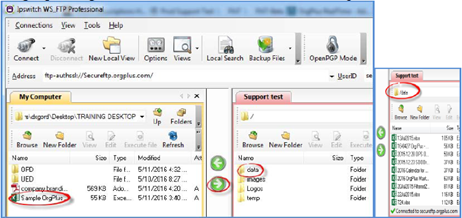
- Open the data folder on the right-hand side (destination).
- Choose the employee data source file or photo files on the left-hand side (source).
- Click the right-pointing arrow in the center.
Please note that your employee data source file name must match the file name of the data source originally uploaded for the domain.
Tip: Most FTP clients allow incremental transfers for only new files or files that have changed.
16. Configure the FTP client scheduler in accordance with the application used, if applicable.
Setup for FileZilla FTP client
Your setup wizard may vary slightly, depending on the FTP client your organization uses.
Make sure SSL ports 6980-7000 are open
- Install the FTP client. When complete, launch the FTP application to configure.
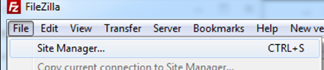
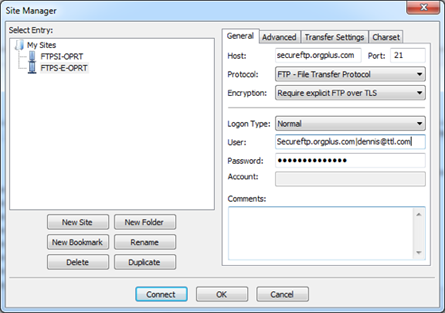
- Select File> Site Manager.
- Click New Site.
- Name the site
- Input Host: orgplus.com
- Input Port: 21
- Protocol: FTP – File Transfer Protocol
- Encryption: Requires explicit FTP over TLS *Explicit Method*
- Login Type: Normal
- User: secureftp.orgplus.com|name@domain.com
Username must be in the following format: Secureftp.orgplus.com|yourusername. (Note the ‘pipe’ between the URL and username.)
- Password: your OrgPlus RealTime password
- Click on Transfer Settings
- Select Passive.
- Click OK.
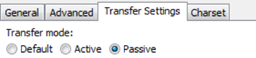
- Click Connect.