
Photos Overview
Insperity Organizational Planning can display photos of employees in the chart boxes and in the profile card so that employees can ‘put a face with a name’.
Accepted image formats
- Images should be limited to specific file types – .jpg (.jpeg), .png, and .bmp.
- Images should have an orientation of Portrait (taller than it is wide). Images that are square, round, or landscape (wider than it is tall) may be skewed or truncated by the application in a negative way.
- Image files should be limited in size to less than 1MB.
Preparing your data
Your data source will need to store information about the photo in order to match the employee with the proper folder. You will need to add a column to your data that will include the name of the photo. The photo assigned in the photo location needs to match what is on your data sheet. File extensions must be included in photo name.

Photo information can be uploaded as a supplemental file instead of using the primary data source. When creating the supplemental file, it is necessary to include the employee’s unique Identifier on the file (Employee ID, for example).
Uploading your data
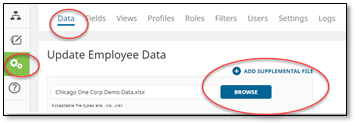
The next step is to update the data in your charts with this new field and information. To update data, go to Administration > Data and Browse to find your updated data source. If you are using a supplemental file for your photo data, click on Add Supplemental File.
Click Save and your updated data will load.
Mapping your photo field
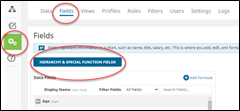
The system will have added the new field to your data fields. The next step is to map the photo field to a special function field that will display your data as an image. Go to Administration > Fields > Hierarchy & Special Function Fields.
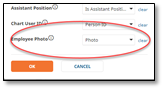
Employee Photo is an option at the bottom of the mapping screen. Select the field name being used in your data that represents the photo information for the employees.
Press OK when complete.
Then Save on the main fields screen to save your mapping.
Uploading photos
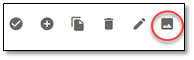
To upload the photos to your organizational chart, go to Administration then the photo icon on the top right menu bar.
Click Browse to find your photos you would like to upload. Here you can multi-select photos or an individual photo if adding photos for new employees. Click Save when complete.
Adding photos to your chart
Adding the field to the box type
To add the photos to your chart view, go to Administration, then Views. Choose the view you would like to update by selecting the edit icon.
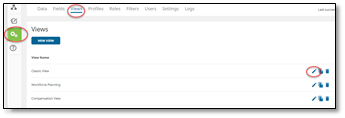
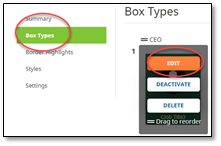
Under the view dashboard, click Edit in the Box Types area then hover over the box type you would like to modify. You will see Edit as an action when hovering. Select Edit.
Next, click Add Data under Field Properties and select Field.
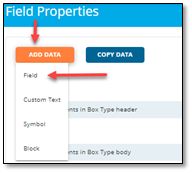
Select your new photo field from the fields list and click Add.

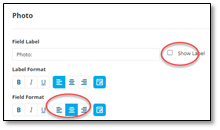
Adjusting the alignment
Check the photo field to display photo properties to the right. You can choose to hide the label from displaying and choose the alignment of the photo within the box.
Copying photos to other box types
Once you have the alignment set on the first box type, you can quickly copy the addition of the field to the other boxes in your view.
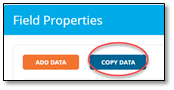
Under Views > (Edit) > Box Types > modified box > Field Properties you will see the Copy Data button.
In the Copy Data window, select your photo field under Copy these fields to the left and select the box types under To these box types to the right. Click Copy when compete.
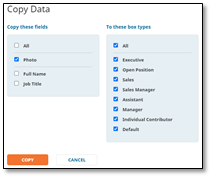
The field will now display on the selected box types.
Adjusting the orientation of the photo display
To change the orientation of the photo so it displays on the box to the left, under Views, Styles select Image on Left under Box Layout.
Troubleshooting
If your photos do not display immediately, re-update your data after adding the images to the system.
If some photos are missing, make sure the name in the file matches exactly with the name of the image, including the extension, that has been uploaded into the system.