
Introduction
The pages set up in the schedules folder in Time and Attendance are used to set up, maintain, and review employee schedules. Schedules are not only used for planning purposes, but also must be used if a company wishes to track when an employee is absent, working on a non-scheduled day, and/or early and/or late at the start or end of the work day. Access to each page is dependent on company set up and individual security.
Team Schedule
The Team Schedule displays the detailed daily schedule in a calendar view. Depending on company set up and individual security, a user may be able to see only their own schedule, their employees’ schedules, or the entire company’s schedules. Supervisors and System Administrators should use this page to make one-off schedule adjustments, as well as to create daily schedules when the schedule is determined from week to week.
Navigating to the Team Schedule Page
- In the Main Navigation menu, open the Daily Procedures folder.
- Open the Schedules subfolder.
- Click on the Team Schedule page.
- Select the dates of the schedule to view from the pay period selected. Selecting multiple dates can be done in either of the two following ways:
- Hold down left mouse button and drag the pointer across the dates. Release the button once all days are selected.
- Use the Select Week link to select an entire week.
- Click the Launch Schedule button, located at the bottom of the page.
Reviewing the Team Schedule Page
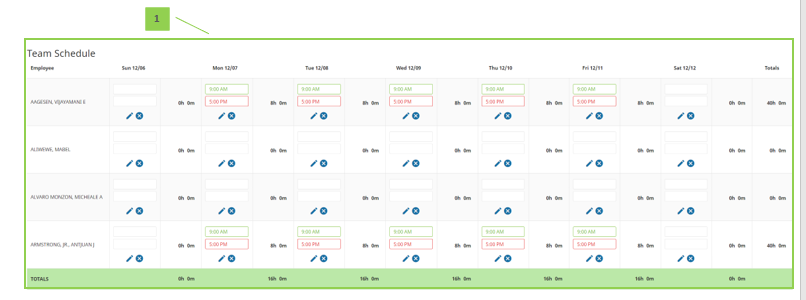
- Employee Schedules
- Rows contain employee names, while columns contain dates. The intersection of the row and column has the schedule for that employee and date.
- Schedule totals across employees for each day display at the bottom of the screen, while totals for each employee across many days display at the right of the screen.
Editing or Removing a Schedule from the Team Schedule Page
To make an adjustment to a schedule using the Team Schedule page, follow the steps below:
- Find the intersection of the employee row and the date column to edit.
- Schedules can be updated in the following ways:
- Place time directly in to the boxes. If time already exists, highlight the hours and type over them or delete them out. The Green box is used for the IN time, while the Red box is used for the OUT time. When finished, click Save.
- Click the Pencil icon to launch the Detail View pop-up window. Fill out the fields as needed, using the Down Arrow button to place in additional detailed schedule information, and the Plus button to add in additional shifts to the same day. When finished, click Save. Field definitions are below:
- In – Time that schedule begins
- Out – Time that the schedule ends
- Unpaid Minutes – Total time not worked during the work day (ex. lunch). This field assists with estimating worked hours but does not deduct from actual hours worked unless paying off of schedules.
- Lunch Start Time – Lunch start time. This field is used within actual vs. worked hours reporting
- Name – Name of the schedule adjustment. Should be detailed enough to highlight what the rule will do (ex. “Mo – Fr 8a-5p”).
- Description – Description of the schedule adjustment. This field often is a repeat of the information contained in the Name field
- Shift Type – Shift to apply the time to when paying off of schedules
- Pay Type – Pay type to apply the time to when paying off of schedules
- Generate Hours Record – Generates an hours record when the employee is going to receive pay but not punch.
- Org Level Item Drop Downs – Allows specific org levels to be assigned to the time when paying off of schedules
- Use the X button to cancel the shift. Click Save.
- Use the Trash button contained within the Pencil icon to delete the schedule entirely. Click Save.