
Introduction
The pages set up in the schedules folder in Time and Attendance are used to set up, maintain, and review employee schedules. Schedules are not only used for planning purposes, but also must be used if a company wishes to track when an employee is absent, working on a non-scheduled day, and/or early and/or late at the start or end of the work day. Access to each page is dependent on company set up and individual security.
Schedule Group
A Schedule Group is used for setting up recurring schedules. Schedule Groups must be created within this page using a set of rules, and then attached to the employee in a separate area of the system.
Navigating to the Schedule Group page
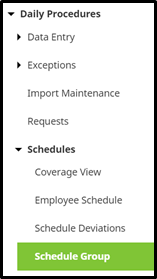
- In the Main Navigation menu, open the Daily Procedures folder.
- Open the Schedules subfolder.
- Click on the Schedule Group page.
Reviewing the Schedule Group page
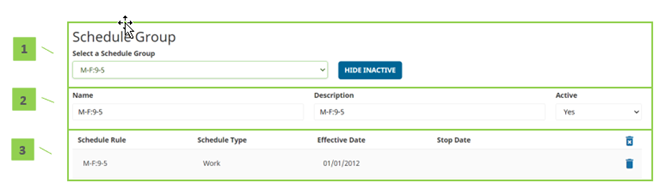
- Schedule Group Selection
- Select a Schedule Group – Created Schedule Groups. Upon selection, schedule rules will be displayed for review/edit/deletion.
- Hide Inactive/Show Inactive – Hides or displays schedules from the list that have been marked as inactive
- Schedule Group Information – Includes the Schedule Group’s Name, Description, and Active indicator
- When Active is set to “No”, the inactive groups will disappear from the available options when assigning Schedule Groups to employees
- Schedule Group Rules – Lists the rules attached to the selected schedule
- Schedule Rule – Name of the schedule rule
- Schedule Type – Type of schedule attached to the rule
- Effective Date – Date that the rule is effective
- Stop Date – Date that the rule becomes inactive
- Unnamed Column
- Audit Log – View details of the audit log associated with the rule
- Delete – Delete the rule
Schedule Group Rule definitions
Below is a list of the fields that will be seen within the Rule Detail pop-up window when editing or adding a rule.
- Name – Name of the rule. Should be detailed enough to highlight what the rule will do (ex. “Mo – Fr 8a-5p”).
- Description – Description of the rule. This field often is a repeat of the information contained in the Name field.
- Schedule Type – Type of schedule
- Schedule Active – Should be set to “Yes” unless marking the schedule inactive
- Effective Date – Date that the schedule rule becomes active. When creating a rotating schedule, this field must contain the date that begins within the week that the schedule rule applies.
- Stop Date – Date that the rule becomes inactive. Can be left blank if no end date exists.
- In/Out Times
- In Time – Time that the schedule begins on the days of the week within the rule
- Out Time – Time that the schedule ends on the days of the week within the rule
- Unnamed drop down – Determines if the schedule spans more than one day
- Unpaid Minutes – Total time not worked during the work day (ex. lunch). This field assists with estimating worked hours but does not deduct from actual hours worked unless paying off of schedules.
- Lunch Start Time – Lunch start time. This field is used within actual vs. worked hours reporting
- Total Shift Calculation – Automatic calculation of hours per day
- Shift Type – Shift to apply to the time when paying off of schedules
- Pay Type – Pay type to apply to the time to when paying off of schedules
- Occurs Every – Determines how often the schedule occurs/reoccurs
- Drop down – After how many weeks the schedule occurs/reoccurs. For example, if the schedule occurs every other week, this drop down should be set to “2.”
- Checkboxes – Day(s) of the week that this schedule occurs
- Work week starts on – Start day of the work week
- Specify Org Levels – Allows specific org levels to be assigned to the time when paying off of schedules. If “Yes”, additional Org Level Item drop downs will appear below for selection.
Creating a Schedule Group
To create a Schedule Group, follow the below steps:
- Click the Add button, located at the bottom of the page.
- Enter in a Group Name and a Description that describe what the schedule will do. For example, “Mo – Fr 8a-5p”. Keep the Active drop down set to “Yes”.
The information will save and the original Schedule Group page will reappear, with the newly created schedule selected.
- Click the New Rule button, located at the bottom of the page
- Create the rule(s) to attach to the Schedule Group. Each rule should be determined by the day of the week. For example, if on Monday through Friday hours are 8a-5p, but Saturday is 8a-12p, two rules must be created; one for Mo-Fr 8a-5p, and one for Sa 8a-12p
- Click Save.
- Repeat steps 3-5 as needed for any additional rules to complete the Schedule Group.
Once the Schedule Group is created, it will need to be assigned to the employee(s). Steps for this process are contained in the section titled “Assigning a Schedule Group to an Employee.”
Editing a Schedule Group Page
To edit a Schedule Group, follow the below steps:
- Select the Schedule Group from the Select a Schedule Group drop down.
- Click on the line of the rule that needs to be edited.
- Edit the rule as needed.
- Click Save.
Deleting a Schedule Group
To delete a Schedule Group, follow the below steps:
- Select the Schedule Group from the Select a Schedule Group drop down.
- Click on the Delete button, located at the bottom of the page.
- Click OK.
An individual Schedule Group Rule can be deleted, as well using the trash can button on the right of the rule line.
A Schedule Group can also be inactivated so it is no longer available for selection when assigning to employees but remains available for future reactivation. To do so, set the Active drop down at the top of the Schedule Group page to “No”.
Assigning a Schedule Group to an employee
- In the Main Navigation menu, open the Employee Maintenance folder.
- Open the Employee Assignments subfolder.
- Click on the Groups page.
- Move to the Schedule Group tab located at the top of the Groups page.
- Click Add New.
- Select the Schedule Group to apply from the Schedule Group drop down.
- Select the date that the Schedule Group will become effective in the Effective Date field.
- Click Save.
If the Schedule Group becomes effective in a future pay period, the Schedule Group field will remain with a status of “Not Assigned,” until the pay period is moved forward.
Schedule deviations
Time and Attendance allows schedule deviations to be made on an individual or group basis to any employee schedule on any day in the past or future. See Schedule deviations for detailed information.