
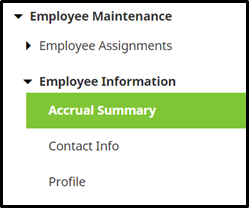
Navigating to the accruals summary page
- In the Main Navigation menu, open the Employee Maintenance folder.
- Open Employee Information subfolder.
- Click on the Accrual Summary page.
Adding an accrual adjustment
A System Administrator can manually add an accrual adjustment to an employee’s accruals by following the below steps.
- After navigating to the Accrual Summary page, move to the Transactions tab.
- Click on the Add button.
- Fill out the following fields:
- Accrual Type – Select the accrual plan in which to apply the transaction.
- Transaction Type – Choose the transaction type. Options include:
- Manual Adjustment – Used for all any and all types of transactions. The adjustment will display separately within the Adjust column in the main Balances tab.
- Manual Accrual – Used to add a manual accrual adjustment. The adjustment will add in to the number under the Accrued columns in the main Balances tab.
- Manual Carryover – Used for adding a manual carryover adjustment. The adjustment will add in to the number under the Carry column in the main Balances tab.
- Manual Taken – Used for adding a manual taken adjustment. The adjustment will add to the number under the Taken columns in the main balances tab.
- Adjustment Hours – Enter the hours to be adjusted, accrued, carried, or taken, ensuring to use a negative number for anything that must be taken or subtracted.
- Effective Date – Select or type the date for the adjustment to become effective.
- Comment – Enter an optional comment to remain with the history of the transaction.
- Click Save.
Editing an accrual adjustment
A System Administrator can edit a manually created accrual adjustment by following the below steps.
- After navigating to the Accrual Summary page, move to the Transactions tab.
- Click on the pencil icon.
- Adjust either of the following fields:
- Accrual Type – Select the accrual plan in which to apply the transaction.
- Transaction Type – Choose the transaction type. Options include:
- Manual Adjustment – Used for all any and all types of transactions. The adjustment will display separately within the Adjust column in the main Balances tab.
- Manual Accrual – Used to add a manual accrual adjustment. The adjustment will add to the number under the Accrued columns in the main Balances tab.
- Manual Carryover – Used for adding a manual carryover adjustment. The adjustment will add to the number under the Carry column in the main Balances tab.
- Manual Taken – Used for adding a manual taken adjustment. The adjustment will add to the number under the Taken columns in the main balances tab.
- Adjustment Hours – Enter the hours to be adjusted, accrued, carried, or taken, ensuring to use of a negative number for anything that must be taken or subtracted. Please Note: When entering a negative number, use the minus/dash symbol (Example -8.00), as this will allow the system to calculate the adjustment correctly.
- Effective Date – Select or type the date for the adjustment to become effective.
- Comment – Enter an optional comment to remain with the history of the transaction.
- Click Save.
Deleting an accrual adjustment
A System Administrator can delete a manually created accrual adjustment by following the below steps.
- After navigating to the Accrual Summary page, move to the Transactions tab.
- Click on the trashcan icon.
- A pop-up window opens asking to confirm the deletion as it is permeant.
- Click OK to delete the transaction.
- Note: this may only be done for the current period or future manual transactions. Transactions in the past may not be adjusted or deleted.