
Introduction
The Requests page in Time and Attendance is used to send and receive Time Off, General, Missing Punch, Message, and Schedule Change requests. Access to each option is dependent on company setup and individual security.
For videos on sending and responding to requests, see the Time and Attendance Video Library
Navigating to the Requests Page
- In the Main Navigation menu, open the Daily Procedures folder.
- Click on the Requests page.
Reviewing the Requests Page
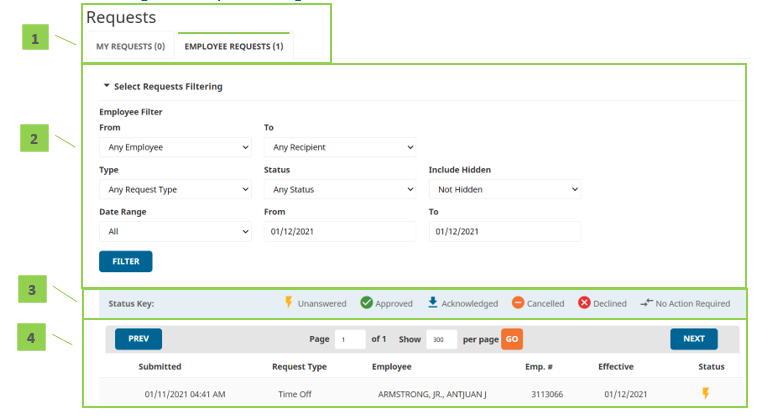
- Page Selection Tabs
- My Requests – View requests that you have sent and send new requests
- Employee Requests – View requests that your employees have sent
- Depending on company setup, a Time and Attendance administrator may have access to see and act upon all requests sent in the system.
- Select Requests Filtering – Filters the data on the page to a specified subset of information. To set a filter, select filter option(s) and click the Filter button. Filtering options are below:
- From – Employee who sent the request
- To – Supervisor for whom the request was sent
- Status/Type Filter
- First drop down – Type of request
- Second drop down – Status of request
- Third drop down – Hidden or not hidden requests
- View Range – Preset date ranges, or place in a start and end date within which the request was sent
- Status Key – Defines request statuses
- Unanswered – Request has not yet received a response
- Approved – Request was approved by the supervisor
- Acknowledged – General request was acknowledged by the supervisor
- Cancelled – Request was cancelled by the sender
- Declined – Request was declined by the supervisor
- No Action Required – No action is needed on the request
- Requests – Displays all of the sent requests on the My Requests tab and all of the received requests from the Employee Requests tab.
Request Detail Definitions
Below is a list of the fields in alphabetical order that may be seen on the main Requests page, or within the Detail View pop-up window when sending or receiving a request. Access to these fields is dependent on company-specific setup and individual security.
- Actual Date/Time – Date and time of the request
- The date can be selected via the pop-up calendar or typed. The time must be typed.
- Calendar – Launches the Time Off Calendar. It is located at the top right of the Detail View
- Date – Date(s) of time off
- Employee – Employee who sent the request
- Emp. # – Employee number
- Effective – Dates requested (dates for time off, dates to change the schedule, or dates to fix a missing punch)
- If the requests span multiple days, a [+ <number of days>] will appear beside the effective date
- Hours/Minutes – Total hours/minutes of time off per day
- Accrual Balance – If the Pay Type selected is attached to accruals, a running balance will display in this column adjacent to the hours/minutes. Hover over the amount to see the accrual plan, committed balance, and running balance.
- Organization Level – Organization level items assigned to a punch record
- Pay Type – Pay Type in which time off or a punch will be applied
- Punch Type – Type of punch
- IND – In For Day
- Used at the start of the work day
- INL – In From Lunch
- Used when coming back from a lunch break
- INB – In From Break
- Used when coming back from a break
- IDA – In For Day Again
- Used when coming back from something else (ex. A doctor’s appointment)
- INS – In From Split
- An automatic punch that appears when worked hours are split at midnight
- TXO – Transfer Punch
- Used to allocate worked hours to specific organization level items
- ALO – Auto Lunch Override
- Used to override an automatic lunch
- CBI – Call Back In
- Used when called back in from work
- OUT – Out
- Used any time work is stopped
- IND – In For Day
- Request Type – Type of request. Includes: Time Off & Punch.
- Scheduling – Updates an assigned schedule with details of the time off
- All Day – Blocks the entire day
- Cancel Shift – Cancels the assigned shift for the day
- Partial Day – Allows the user to place in a time that starts the time off
- Status – Status of the request
- Hover over the status to see its definition.
- Submitted – Date and time of request submission
- Total Time Calculation – Automatic calculation of the total projected work hours for a schedule
- Delete – Delete a line of data
Sending Requests
An employee can send requests for any current or future pay period through the Time and Attendance system. These requests can be received by one or more supervisors or administrators and approved, declined, or acknowledged. There are five types of requests: General Requests, Time Off Requests, (Missing) Punch Requests, Schedule Change requests, and Messages. The process for sending each request type is outlined in this section.
Sending a Time Off Request
A time off request allows an employee to request time off through the Time and Attendance system. An acceptance of the request will automatically update the employee’s timesheet with the time off. To send a time off request:
- Click the New Request button, located at the bottom of the page.
- Select Time Off Request.
- Select the person for whom to send the request in the Send Request To: drop down.
- Click the Plus button located at the right of the Requested Date(s) section.
- Fill in the fields in the Add Dates pop-up window.
- Hours/Minutes – Total hours and minutes per day of time off
- Pay Type – Pay Type in which to apply the time off
- Calendar – Dates of time off
- Dates will turn orange once selected. Selecting multiple dates can be done in either of the two following ways:
- Hold down left mouse button and drag the pointer across the dates. Release the mouse button once all days are selected.
- Hold down the control button on the keyboard, and click each individual date.
- It is recommended to place separate time off requests for each separate block of time off.
- Select scheduled work days only. For example, if an employee typically does not work on weekends, that employee should not select the weekend when requesting time off that spans multiple weeks.
- Dates will turn orange once selected. Selecting multiple dates can be done in either of the two following ways:
- Click Add Dates.
- Review the data on the Detail View and make any adjustments to each individual day as necessary.
- Place a comment in the Comment field if necessary.
- Click Submit Request.
Submit a Missing Punch Request
A missing punch request allows an employee to send a punch to their supervisor or administrator that they had missed. An acceptance of the request will place the punch into the timesheet, cleaning up the critical Missing Punch alerts. For additional information on Missing Punches, including how to send a Missing Punch Request from the Punches page, see the section “Fixing a Missing Punch” within the User “Punches” User Guide.
To send a missing punch request from the Requests page, follow the below steps:
- Click the New Request button, located at the bottom of the page.
- Select Punch Request.
- Select the person for whom to send the request in the Send Request To drop down.
- Fill in the details of the would-be punch in the Punch section of the request.
- Place a comment in the Comment field if necessary.
- Click Submit Request.
Canceling or Withdrawing a Request
Once a user has sent a request, they may wish to make a correction to the request or remove it completely. To remove a sent request, follow the below steps:
- Click on the line of the request to remove in the main requests area.
- Locate the button at the bottom of the request Detail View. The button will either display the option to Withdraw Request or Cancel Request. These options and steps to complete the removal of the request are below:
- Withdraw Request – Removes a request that has not yet been approved/declined/acknowledged by the person receiving the request.
- Click Withdraw Request.
- Cancel Request – Removes a request that has been approved/declined/acknowledged by the person receiving the request. This action requires a supervisor or administrator to approve or decline the removal.
- Click Cancel Request.
- Click Submit Cancellation Request.
- Withdraw Request – Removes a request that has not yet been approved/declined/acknowledged by the person receiving the request.
Receiving a Request
A supervisor or administrator may receive a Time Off, Punch, Schedule Change, General Request, or Message from their employee that will require a response. This section will explain how to know a request was received, as well as how to respond to a request.
Request Notification Methods
A user will be notified that a request has been sent to them through one or all of the following methods, depending on the company set up:
- E-mail – An e-mail will be sent notifying the user that a request has been sent to them. The data that appears in the request is dependent on the company set up, as well as the type of request that was sent. The user may be able to respond to the request by using buttons within the e-mail; otherwise, they must log in to the Time and Attendance system to respond.
- Time and Attendance Bubble Notification – The blue bubble at the top left of the Time and Attendance system contains a number counter that will increase when a request is received.
- Approval Error – Requests must have a response for a timesheet to be successfully approved. Should there be an outstanding request within the pay period being approved, an error will appear reminding the user to respond to the request.
Responding to a Request
To respond to a request, follow the below steps:
- Go to the Employee Requests tab, located at the top of the Requests page.
- Click on the line of the request that requires a response. Any unanswered requests will have an “Unanswered” status in the far right column.
- Review and adjust the information contained in the request as necessary.
- Place a written response in the Response field if necessary.
- Select the action to take on the request using the buttons at the bottom of the Detail View pop-up window. Options include:
- Acknowledge – Acknowledges the request, notifies the employee, and updates the request status to “Acknowledged”.
- Approve Request – Approves the request, notifies the employee, and updates the request status to “Approved”. An approval will update the system in various ways, dependent on the type of request. The result of each request type approval is below:
- Time Off Request – Places the data into the timesheet, deducts from accruals when accruals are linked, and updates the schedule if schedules are activated and attached.
- Punch Request – Places the punch from the request into the timesheet and removes the Missing Punch error.
- Decline Request – Declines the request, notifies the employee, and updates the request status to “Declined”.
- Recommend Approval of Request – Sends the request to next approver in an established hierarchy and updates the previous responses with a recommendation of approval when a Request Workflow is in place for the company.
- Recommend Denial of Request – Sends the request to next approver in an established hierarchy and updates the previous responses with a recommendation of denial when a Request Workflow is in place for the company.
If the request leads to a negative balance, a message will appear. Should the company allow a negative balance, this message can be accepted through; otherwise, the user must adjust the request before the request can be approved.