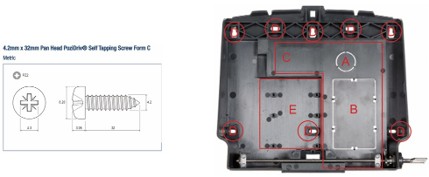
Mounting of the back panel
The clock should be positioned in a clean/dry location, with approximately 180mm (7”) clearance around the unit and at a height suitable for all employees to use. For compliance with Americans with Disabilities Act (ADA) guidelines the top of the back panel should be no more than 1.2m (48”) from the floor. The clock should be secured in position using fixings suitable for the surface on which it is mounted. Screws should be pan head type.
Hanging the front panel
Once the back panel is secured the clock front panel can be fitted. Plug-in any cables to the front panel first, then hooking the tabs on top of the front panel into the locating points of the back panel. Front display will hinge down into its final position. Securing with key latch on the side of back plate.
Placement
The device should be fixed to a flat surface at a height that is comfortable for users to view and interact with the screen without glare from reflections and in a suitable level of ambient light.
Secure to a Vertical Surface: Before mounting the back panel first fit any biometric reader options as these need access from the rear of the unit.
Bring in any cables through snip-out apertures (A or B). Cables may be routed within the cabling cavity between the back panel and mounting surface (C).
Fix the back panel to a flat vertical surface at a height of 1.48m (4’ 10”) above the floor. (Please observe ADA guidelines concerning the height for installation to ensure that users will be able to comfortably see and operate the touch screen).
It is recommended to use a minimum of four 4.2mm x 32mm self tapping screws with plugs suitable for the type of wall. The fixings can be made through any of the holes marked (D).