
Time and Attendance offers reports that are robust and can be set up to pull unique information and display it as needed.
To access reports, navigate to Reports and select Generate Reports.
Generate reports
The Generate Reports page has been divided into sections, including Profile, Date Range, Filters, Parameters, Sorting, and Output. Sections may be expanded or collapsed by selecting the triangle icon located to the right of each section. The following is what displays after selecting Reports > Generate Reports from the navigation tree:
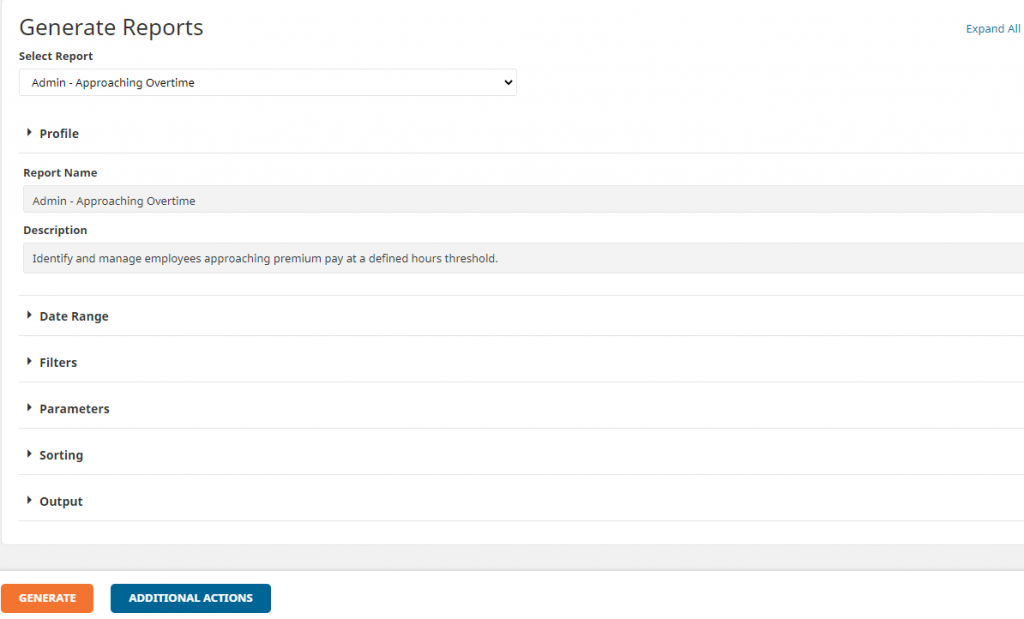
To generate a report, select the desired report from the ‘Select Report’ drop-down menu at the top of the page, and then update each section as needed.
- Profile: This section shows the name and description of the selected report. No changes should be made here.
- Date Range: Enter the date range you wish to review. (You can select a pre-set range from the drop-down menu or select ‘custom range’ from that menu and enter the desired date range manually.)
- Filters:
- Use the Filters section to select the employee(s) you wish to review. Available filters will vary by the report and the most common include:
- Employee – This allows you to report on a specific employee (or employees) by name. The list of available names will include anyone who is active within the pay period selected in the taskbar. Any employees not active within the selected pay period will not show as an available selection.
- Pay Group – Allows you to report on all employees assigned to the selected pay group(s) during the selected Date Range (including employees that have since been terminated).
- Home Org Level – Allows you to report on all employees assigned to the selected home organization level(s) during the selected Date Range (including employees that have since been terminated).
- Please note that filters are compounding. For example, selecting “Full Time Hourly” from the pay group filter and “Office” from the home org level filter will produce a report for employees that meet either filter, not solely employees who meet both filters.
- Use the Filters section to select the employee(s) you wish to review. Available filters will vary by the report and the most common include:
- Parameters: Fields in this section will vary widely, depending on the report selected. Review each available field and select the settings that best suit your needs.
- Sorting: This section allows you to change the order in which information in this report will be sorted. Select the settings that best suit your needs, or leave at the defaulted values.
- Output: This section allows you to select the format in which your report will be generated. While the fields may vary depending on the report selected, the most common fields here are:
- Output Option – Allows you to choose a formatted report or a raw data report.
- Output Format or Export Format – Allows you to select in what file type the report will generate (i.e. .pdf, .doc, .rtf, .txt, .xls)
- Page Break – Allows you to define where page breaks should occur, in accordance with your selections in the Sorting section.
- Suppress Employee Number, Suppress SSN, etc. – Allows you to suppress the defined sensitive data from the report.
Once you have made the desired selections in each section, click the GENERATE button at the bottom of the page.
Saved reports
Create saved reports
For reports that you use regularly, you can save a report template. This action allows you to save your Date Range, Filters, Parameters, Sorting, and/or Output selections in a template, rather than having to select them each time. To save a report template, follow these steps:
- Navigate to Reports > Generate Reports.
- Select the desired standard report from the “Select Report” drop-down menu.
- Make the standard selections (i.e. Date Range, Filters, Parameters, Sorting, Output).
- At the bottom of the page, click the ADDITIONAL ACTIONS button.
- This will give you a menu of Additional Action buttons; click the SAVE AS button.
- A pop-up box will appear, allowing you to enter a name and description for your new report template.
- Click the SAVE button to complete the process.
You will then be able to select this new template from the “Select Report” drop-down menu at the top of the Generate Reports page.
Update saved reports
In the event that you need to update the settings for an existing saved report, follow these steps:
- Navigate to Reports > Generate Reports.
- Select the desired standard report from the “Select Report” drop-down menu.
- Make the standard selections (i.e. Date Range, Filters, Parameters, Sorting, Output).
- At the bottom of the page, click the ADDITIONAL ACTIONS button.
- This will give you a menu of Additional Action buttons; click the SAVE REPORT button.
This will save your changes to the existing saved report template.
Delete saved reports
In the event that you no longer need a saved report, follow these steps:
- Navigate to Reports > Generate Reports.
- Select the desired standard report from the “Select Report” drop-down menu.
- At the bottom of the page, click the ADDITIONAL ACTIONS button.
- This will give you a menu of Additional Action buttons; click the DELETE button.
- A pop-up box will appear, advising that this will permanently delete the saved report template (an action which cannot be undone) and asking you to confirm the action.
This will remove your saved report template permanently from the “Select Report” drop-down menu.
Share saved reports
Saved reports are visible to only the user who created the template. However, a saved report can be shared with other users if needed. To share a report, follow these steps:
- Navigate to Reports > Generate Reports.
- Select the desired saved report from the “Select Report” drop-down menu.
- At the bottom of the page, click the ADDITIONAL ACTIONS button.
- This will give you a menu of Additional Action buttons; click the SHARE button.
This action will share the selected report with anyone who also has access to the standard report from which the saved report was created.
Favorite reports
To create a report favorite, follow these steps:
- Select Reports from the navigation menu.
- Find the report you wish to save as a favorite from the appropriate section – System (a.k.a. Standard), Shared, and User.
- Hover over the report name until the Favorite icon appears to the right of that line.
- Click the Favorite icon to add this report to your Favorites.
You can then select Favorites from the navigation menu, and this selection will appear in the Reports section there.