
Reports may be scheduled for automated processing, as a single scheduled task, or on a recurring schedule.
Creating saved reports
Before establishing a schedule, a report template must be saved. To create a report template, follow these steps:
- Navigate to Reports > Generate Reports.
- Select the desired standard report from the “Select Report” drop-down menu.
- Make the standard selections (i.e. Date Range, Filters, Parameters, Sorting, Output).
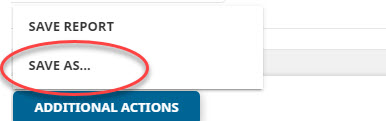
- At the bottom of the page, click the ADDITIONAL ACTIONS button.
- This will give you a menu of Additional Action buttons; click the SAVE AS button.
- A pop-up box will appear, allowing you to enter a name and description for your new report template.
- Click the SAVE button to complete the process.
Scheduling saved reports
Once you have a saved report template, you will be able to schedule this report for automated processing. To do so, follow these steps:
- Navigate to Reports > Schedule Reports.
- If this is your first scheduled report, the scheduled report template will appear by default.
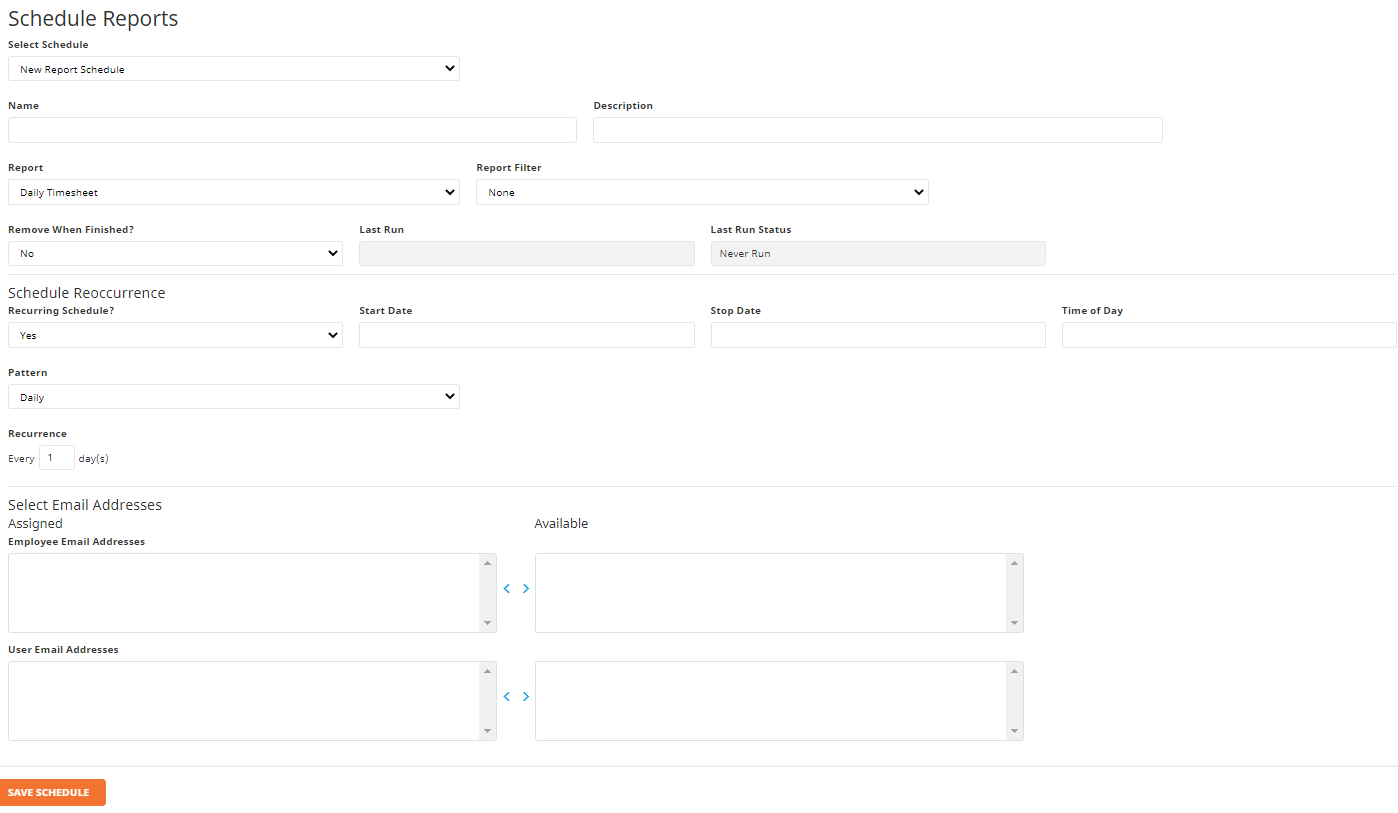
If other scheduled reports exist, you will see an ADD SCHEDULE button at the bottom of the page. Click this button to see a new scheduled report template.
- Enter the schedule ‘Name’ and ‘Description’.
- Select the Report template to generate.
- Update the Report Filter field as desired:
a. None – Each recipient of the report will receive the full report.
b. Employee – Allows an administrator to schedule a report to be sent to multiple
employees, but each will receive only his/her own data.
- Remove When Finished:
a. Set to ‘Yes’ to no longer list the report as scheduled in the system after it has been
generated once
b. Set to ‘No’ to leave the report schedule active. - Define the Schedule Reoccurrence options.
a. Recurring Schedule:
i. Set to ‘No’ to generate the report only once
ii. Set to ‘Yes’ to generate the report a number of times
b. Start Date: Enter the date to begin generating the report.
c. Stop Date: If applicable, enter the date to stop generating the report. If no stop date is
entered, the report will run as scheduled indefinitely.
d. Time of Day: Define the time of day to generate the report.
e. Pattern: Set the recurring pattern (daily, weekly, monthly, etc.)
i. Based on your Pattern selection, define the recurrence in more detail. - Select the Employee Email Address(es) and/or User Email Address(es) to determine to whom the report will be sent at the scheduled time.
- Click the SAVE SCHEDULE button.
Please note: Report details will be based on the permissions of the user that scheduled the report, regardless of to whom the report is scheduled to send. (For example, if an administrator schedules a report to be emailed to an employee, the employee will receive the report with administrator-level details.)