
Getting Started
What basic information is needed to create a chart?
Important information to know:
– The express version of the application only allows 12 fields (columns) to import, including the hierarchical information.
– The application is built off a hierarchy. At a minimum, you need an employee Unique Identifier, a Report To, Name, and any other information you need to populate in the chart.
How to access your datasheet:
When you first log into the application, you will have the option to Download Employee Data (This is a sample file that can be used as an example).
What are the required fields:
The key column headers on the file are the Person ID and Supervisor ID (the reporting relationship).
– Person ID or the key identifier must be unique. This is what the system uses to identify a person or thing.
– Supervisor ID is needed to show that the employee reports to that supervisor. To be a supervisor, the supervisor ID must exist in the Person ID column.
Note: Make sure to enter the supervisor’s Person ID in this section.
Updating or changing column headers:
The rest of the column headers can be changed or removed. You’re not required to use the suggested field names shown; however, the prebuilt Views (Employee Directory, Org Chart + Department, etc.) use the suggested field names. If you change the field names in your employee data file, you will be required to edit the Views so that the fields display properly.
How do I import my data?
Using the file that you saved earlier, follow the below steps:
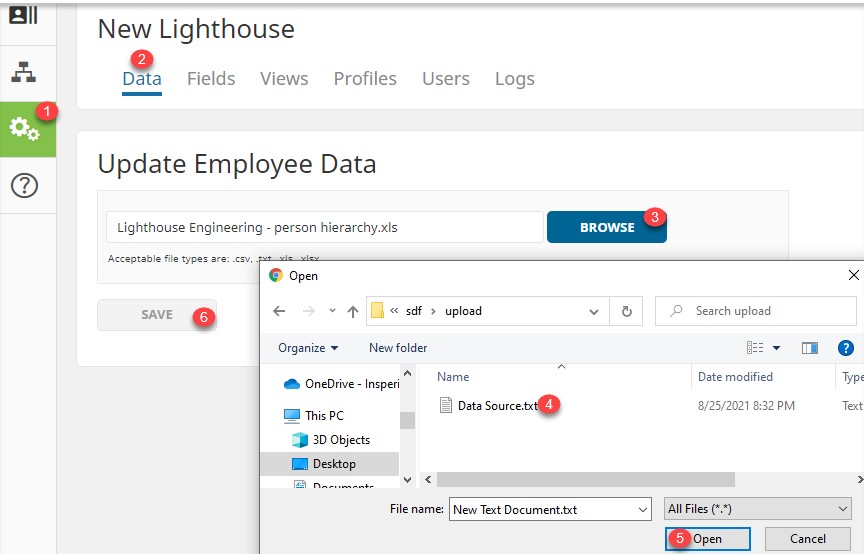
– Click the Administration tab on the left.
– Select the Data Tab.
– Click Browse to select your Data Source file from the saved location.
– Select the file name.
– Click Open.
– Click Save.
Note: Data needs to be in one of the following file types: Microsoft Excel (*.XLS, *.XLSX), comma-separated value (.CSV), or text (.TXT).
After uploading my datasheet, how do I visualize my chart?
The application comes with one default View. Views display different information in the boxes, colors, and even border highlights based on specific conditions.
Follow the below steps to create or edit a View after selecting the Administration option.
1. Click Views.
2. Click New View to create a new view. Enter name and click SAVE.
– OR- click the “Pencil” icon to edit a view.
3. Click Box Type on the left. Hover over one of the boxes and click Edit.
4. Click ADD DATA.
5. Click Field (This allows you to add fields that were part of your datasheet and imported into the application).
6. Select the needed Field.
7. Click ADD.
Repeat the step to add all the fields you need to populate. Once complete, arrange the fields to your liking by selecting the field you added. This will bring up another small window to the right of the fields.
You can add/remove the field label, center the field in the boxes, word wrap, etc.
Note: If all the box types will have the same content, click COPY DATA to copy all needed fields to the other boxes or you can manually add data to all the other box types.
For more details on configuring your views, see Creating/editing a view. Some features in this article may not be available in the Express version.
I added the fields to the boxes. How do I view my chart?
Select Workspace on the left panel.
How do I print/publish my chart?
Select the Workspace icon.
Select the Share icon on the toolbar.

Publish/Share your organizational chart using one of the available options (PDF, PowerPoint, Excel, or HTML).
Note: Please see the Insperity Help Center job aid below for information on publishing your chart.
Select the Share icon on the toolbar.
Publish/Share your organizational chart using one of the available options (PDF, PowerPoint, Excel, or HTML).
Note: Please see the Insperity Help Center job aid below for information on publishing your chart.
OrgPlus Realtime Express FAQ
Data
What file formats are supported for my OrgPlus employee data?
Users
How many users can I have in the Express Edition?
Creating user accounts in OrgPlus
Chart
How do I visualize more insightful data or plan changes to my organization?
Adding box border highlights to a view
Conditional field styles in OrgPlus